Thursday 28 June 2012

Colour Schemes - External

Ok folks need some opinions on colours...

The external components that need to be worked out are:
  • Garage Door
  • Bricks
  • Colourbond roof and guttering
  • Paneling / Render colours
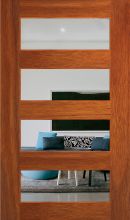
  • Front door 
  • Window frames


On the plans shown, the front and front door side of the house are rendered.  The alfresco and suspended parts of the house are paneling and the remainder is brick.  All of the roof is colourbond and the alfresco has glass and aluminum around the edge of it.

The first thing to be noted is that some of these components have limited colour options, most notably the garage doors.  Below are the narrowed down selections.


Garage Door - http://www.dynamicdoorservice.com.au/
Door Type:  Sectional Overhead
Style: Slim-line
Colours: dune, woodland grey or surfmist


Bricks - http://www.boral.com.au or http://www.pghclay.com.au/

Blue Steel Flash would be No 1 and Ascot No 2 at this stage subject to seeing how it matches with other colours and what it looks like in a physical sample.

 
Roof and Guttering -  http://www.colorbond.com/
We want to go with a lighter colour for the roof and it will be colourbond not tile.


Render, Paneling & Window Frame Colours - These will be indicated by the colours above for bricks, garage and roof but we are inclined towards either blue greys or browns and creams.

Front Door - This is already chosen as per the image shown.  It will be wood stained and is 1200mm wide.


Tuesday 26 June 2012

The Signed Up Plan

So here we are with the final plan.

You may note there is no screen wall in front of the powder room, but we realised that if we had a fixed wall there it would make it very difficult to move furniture into the main living area or the kids area.  So what we have decided to do is to buy a second front door that compliments the one we will have on the entry.  We will mount it where the screen wall would have been on hinges so that it can be folded back against the entry wall when we need to move stuff through that area, and have it fixed with a clip on the floor the rest of the time.

We also decided to go with raked ceilings through the meals / living area to give this part of the house a really open area feeling.

The changes to the robe and ensuite added another 0.5m onto our bedroom so I have my hotel size bedroom with a great view of the backyard and down the hill.

And the bottom level.  The laundry trough we are getting looks like a kitchen sink only deeper, so when we put extra cabinets in down in the games room area it can double as a kitchenette sink. 

We decided to put the laundry / back door out to the area under the house so that when the weather was bad we could have a 2nd washing line under there for drying washing,  The area under here is also big enough that if in the future we wanted to put in a granny flat we can.

And finally this is roughly what it will look like.  So now happy with the plan, we have committed ourselves to the other half of our ridiculous debt.  Now the wait - roughly 6 weeks to get the mortgage approved and documents through council.  Steve reckons we will be in before Christmas - we will see!!


Thursday 7 June 2012

Yay We Got It

As a woman it is my job to not be satisfied but we finally got the last couple of issues resolved.

The ensuite / robe problem got solved by once again solving the issue from a different angle.  Rather than trying to create a walk in robe each or a combination of WIR and wall robes it was suggested to me that we make it more like a dressing room, with built in units around the outside of the room and then an open area in the middle where either a narrow chest of draws or a seat can be put.

I also saw some pictures of rooms where rather than the robe being a hidden storage area it was made a feature of the room.  The nicest one was done using Shoji doors which gave the bedroom a light airy look but also allowed the "dressing room" to be opened up to the main bedroom, giving the room an even larger feeling.

The Robe / Dressing Room Concept
To get to the ensuite you walk through the "dressing room", so to keep with the light feeling we are putting a panel of obscure glass in the sliding door between the dressing room and ensuite so natural light comes into the dressing room from both sides - although of course we will have lights in the room as well.

Once we had this worked out the ensuite then became much easier as we could basically put the entry into it anywhere we wanted and just adjust the built in WIR units to suite.

The other issue was then the one of if the pantry would be open to the kitchen as per the design show in the blog for version 1 or if we would close it off as a separate room.  We got peoples opinion and considered the good old triangle that everyone talks about for kitchens.  P and I then also had a talk about our habits and how we worked in the kitchen.  We came to the conclusion that we were not the sort who would use the pantry as a "butlers pantry" - the latest trend.  We would not have kettles and toasters hidden away in a back area, they would be bought out into the main kitchen even if there was a bench for them out the back.  Secondly if we had a pantry with a door on it - when honest with ourselves we realised the door would rarely if ever be closed.  Therefore what was the point of having a door.  When we do food preparation we tend to do most of it near the sink, particularly prepping and washing vegetables, so having extra bench space near the sink was advantageous.  So in the end we decided to go with the fridge down into the pantry area and the extra bench space in the kitchen.

So now with these ideas it was off to Steve for the final drawings prior to sign up!