Thursday, 19 July 2012

Moving Along - A few Tips in Planning - Council Stuff

Now its time for the long wait - well at least it feels long.  The plans are with council but its going quite smoothly and we know that they are doing "things" as we keep getting little questions. 

So the tips on the council process with things that have come up for us that you might want to ask your builder about:

1.   Make sure you know exactly where the sewer line on your block goes as you might need to get a waiver if its too close to the house.  Its not really an issue just another cost.

2.   Check what the council rules are for retaining walls as they might need a form for those too.  This one can be tricky.  We might need a retaining wall on one side but until the block is cut we don't know for sure and if we do need it we don't know how high its going to need to be.  The estimate we have is that it is likely to be lower than 1m and that doesn't need council approval but I have heard that in at least one location you have to have a permit for anything over 3 bricks high.

3.  Houses in our area normally have to be set back 6m from the front land line, however we are going to have ours placed further forward in order to fit it onto the block.  In the Estate agreement they had a provision in there that indicated that all houses could be set forward to 3m from the line and that each of us would have to agree if our neighbours wanted to access this provision.  Despite this being in the contract and we still have to get neighbor impact statements.  Its not a big problem, and luckily we had already met and exchanged details with one of our neighbours who helped straight away.  The estate has now also put us in contact with the other one so hopefully they will get the paperwork in shortly too.

4.  Fortunately our builder automatically organised the driveway permit when they did the initial submission to council and its been approved already, but if your builder doesn't do this you might need to do it yourself.

5.  The other one that my builder is helping us with is the approval for the shed.  This will be a separate submission.

Tuesday, 17 July 2012

The Kitchen

An exciting few days last week with choosing the colours, visiting the cabinet maker and choosing the lights.  So the delay in this post has actually allowed me to show everything we chose for the kitchen.
The background colour is our benchtop.  It is Caesarstone Wild Rice.  The cupboards will be primarily the middle colour Laminex Moleskin with a feature colour on the back of the island bench, the overhead cupboards and the fridge space in Laminex Tawney Linewood (the bottom right sample).  We chose this woodgrain as we don't like the pale woods for cupboards but needed something with a light feature through it so that the feature side of the freestanding bench would not look odd against the bamboo floor.  Also given we do not seem to have two pieces of furniture made out of the same wood it picks up a range of colours there too.
The floor in the kitchen will be welded vinyl.  I know it sounds like an odd choice but having had wooden, vinyl and tile floors I like vinyl the best.  It is more hardwearing than wood, more forgiving than tiles when things are dropped and easier to clean than both.  With the modern vinyls there is a great range of colours.  The one we have chosen is a brown speckle as it (like the linewood) picks up the range of colours used.  Although there is a lighter version which is primarily the light colour with the brown and dark speckles through it.  I will be getting some samples to try out.

Similar Colours & Pendant lights
This image is roughly what the kitchen will look like.  Either side of the cooker are two deep pots drawers with a skinny draw above each for cooking utensils and lids.  Above that are two glass fronted cupboards that lift up and in which I will keep all the spices and that sort of "stuff".  Above those are standard overhead cupboards.  

Along the other wall is the fridge space with overhead cupboards.  These cupboards will be high enough to put my cook books in.  The fridge space is wide enough for one of those fandangled chilled water fridges and has its own water supply point.  The bench then has a cupboard, draws and a cupboard which I will use for tea and coffee type stuff, cups, glasses, t-towels and all the rolls of gladwrap, baking paper etc.  In the middle of that bench is a pull out cupboard that will contain the kitchen bins.   

The bench will have the space for the microwave with a draw under it,  a bank of draws down the end furtherest from the sink (so the kids can set the table without coming all the way into the kitchen) and the rest is cupboards.

Similar Colours
Pendant Style
There will be spot lights over the main area of the kitchen and in the pantry and then pendant lights over the bench.  The images show similar colours, the lights and the style of bench top.


Bench with Waterfall side


Sunday, 8 July 2012

Ensuite Colours

I love my ensuite colours!!


The feature and floor tile is a porcelain tile 20 x 60 which is shot through with creams, greys and browns.  The tile I am putting on all the other walls is the same size in a light colour that looks like a sandstone.

The bench will have a benchtop called Fossil (appropriate for us two old buggers!!) and the cupboards are Sandy Birth which blends in beautifully with the light tile.

One of the things P did not want in the bathrooms was a heap of different size tiles.  In a couple of display homes we looked in they had one size on the floor, a different size for the walls another size for the contrasting colour on the bath frame and then a feature tile as well - so four different sizes and in one case the tiles did not even have common dimensions ie. 20cm tiles next to 30cm tiles.  Although I have 3 different sizes in the kids bathroom they are all multiples of 15cm so the grouts can all be lined up. 

 
Anyway in our bathroom P absolutely has his wish - one size tile!  There will be one light in the ensuite on the wall where the sliding door is and an LED centrally behind the bench.  I would eventually like to put a mirror and small shelf along that wall at some stage for my makeup.  There will also be an exhaust fan outside the shower.  I have made the lights in this room two way so it can be turned on and off from both our side of the ensuite and the study/guest side.    The image below shows how the layout will be.

Late entry - we changed the exhaust fan in the ensuite to the style with the light in it, same as the powder room.  The reason for this is that once the roof went on the change to the available light in that area was remarkable and it became evident that once the walls went up the shower would be too dark.

Tip - Review your light fittings and the light in rooms once the roof is on.  


Saturday, 7 July 2012

Kids Bathroom Colours

This one is basically how I indicated I would go previously.  I actually found the exact tiles I saw on the internet so got those as the kids feature.  For the benchtop I chose a laminate called Cherished Wood.  It is a wood grain (obviously) but is shot through with a very subtle blue tinge, but its enough to pick up the blue in the floor tiles.  The cupboard doors will be polar white.  I did try some creams and a very pale blue but it was too many different colours in the room and I thought it better to keep with the hint of blue rather than making it a real feature colour.  These colours have scanned in pretty close to the actual colours although the brown in the feature tiles is not quite that dark.

The sink is semi recessed and square.  The shower screen is a semi framed glass one 1200 x 1000 - nice and big for my large sons!!


I have decided to extend the bench across the width of the wall and run the bath spout out of it.  I looked at the floor unit taps but most of them look like they would not stand up to the sort of punishment my kids might give them and end up being wonky and wobbly - not a good look in a nice bathroom.  The light above the mirror is a tiltable one so the kids can adjust it to their need.  There will be not central light in the bathroom but there will be an exhaust fan.  The powder-room which is also the kids toilet will have the same tiles as the kids bathroom and will have a central light that is also an exhaust fan.


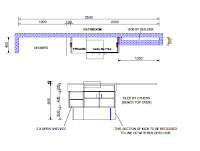
The images below show the layout within the room with the colours and the diagrams from the cabinet maker.


Friday, 6 July 2012

What we chose - External Colours

Well I was told be careful of the colours on the internet and even those in brochures and it is TRUE.

P and I had narrowed down our choices to down to the seven shown in my June blog.  The one that was my favorite was actually very disappointing in reality particularly given the glaze was just on the surface and the sample that had been sent to my colour selector had a small chip out of it showing that any damage to the brick showed through the common red that was underneath.

Another couple of them had like a painted on glaze to mute their colour but the glaze looked like someone had spilt milk on them and it had dried and cracked so they were quickly eliminated too.  Two others were quite different in colour than they appeared on the internet.

Tip - Make ABSOLUTELY sure you see the brick choices in reality don't rely on just internet or brochure images.

I finally narrowed it down to two the Windorah and Outback Blend.  Both had the colour and colour variations baked into the brick rather than as a painted on glaze which I thought gave them a nice and stable look.  The Outback Blend was more redish than the Windorah.

The colour coordinater who worked with me was fantastic.  We sat on the floor with the two brick samples and a mass of colour samples of window frames, garage, colorbond and gutters.   The original muted greys and browns I originally thought I would go for just did not go with the bricks so I ended up going more with the browns and cremes.

After much tooing or froing and a phone call to P to see if he wanted the more redish Outback Blend or the more neutral Windorah - I settled on Windorah.

So in the end we ended up with:
  • Windorah for the bricks
  • Colorbond Paperbark for the roof
  • Colorbond Jasper for the gutters and fascia
  • Stone Beige Satin for the window frames
  • Jasper and Cargo White for the painted render and paneling.

And as per the advice above the colours on here are not quite right compared to the real thing.  The bricks are not as orange and the gutter and feature colours are more brown than green.  The roof is relatively close but the render colour showing is not quite so close and a little paler - but you get the idea.

Late Addition:  I have tried the scanner to see if that makes the colours anymore realistic so here is that version of the colours (You get the idea of what I mean about the colour variation - the ones above were from the internet these are closer to the samples I have):
Gutters & Fascia Jasper & Render Feature
Roof Paperbark & Windowframe colour


So on the house this is is where the colours are going to be:


Wednesday, 4 July 2012

Ensuite Ideas

We are thinking maybe light to medium colours for the tiles in the ensuite.  I like the idea of one of the wall running into the floor like the picture to the right.

Neutral colours but not sure which ones.


With the vanity there will be three long skinny windows with a skinny mirror in between each one on the wall the vanity runs along.    The vanity will be 1600 long with the laundry chute in the middle but I would like to try and have something like the two brown ones shown above with the open cavity in them but also like the idea of the towel nooks in the middle one.

 Depending upon the configuration we go with and if I have clearance under it or not I was considering a built in bin and also possibly the same in the kids bathroom.


Kids Bathroom - What We Are Thinking

We bought some tiles for our ensuite when we were going to renovate it so now that we are not renovating rather than waste the tiles we have decided to use them in the kids bathroom. The floor tiles are a very dark blue, almost black with a pinstripe. The wall tiles are a brick sized white tile which will go floor to ceiling.


I am thinking of using a woodgrain or mostly woodgrain with just a bit of white in the kids vanity.  We have had a totally white vanity before and with the kids they just end up filthy no matter how many times I wipe it clean.  So perhaps something like these.  I like the mix of colours in the one to the right but I think I prefer the style of the one below.


The sink will be a semi recessed square one.   We did considered double sinks but have them in the kids bathroom now and they don't both get used so we are going with just one. 

As there will be space at the end of the bath I am thinking about maybe extending the bench along the wall that will run in front of the bath. So if I went with the style in the picture that has the bench top the same colour as the sides then rather than coming down on both side it would be an L shape just with the leg part next to the shower and then the bench going across the length of the rest of the wall.  Sort of like this image.


So the trick will be to tie a vanity with brown colours into the other tiles but I saw an idea of a feature tile idea using a mosaic that could be used to pull the whole bathroom together, and given it is quite a large bathroom (3.6m x 2.1m) I think this would work.

The image above of the tile idea which is a strip running down the wall and across the floor, using a mosaic something like one of the ones shown.

We have our bath already.  It is a free standing type, a nice long 1700mm long .   I am really looking forward to having a nice long soak in this bath, the sloped back will be great for relaxing in and the length means my feet won't hang over the edge like they do in the our current bath!! 

One of the things we need to consider is if we will go with a floor unit type of tap or work out some way the taps will come out of the wall.  If we have the taps come out of the wall then it will need to flow into the end of the bath as the side of the bath will be next to the window.  I am not sure about the floor unit types of baths though as I am worried the kids might end up bending it or it getting damaged in some way as they seem more fragile.

So watch this space to see what we choose!!